Adding a new product attribute is one of the most popular operations in Magento 2 because attributes play an important role in solving many practical tasks related to a product. That’s why in This blog, We are going to explain how to add product attributes programmatically in Magento 2 using the InstallData.php file. Using the way of creating a product attribute programmatically saves lots of time instead of manually.
We will need to take the following steps to add the new attribute:
- Step 1: Create file InstallData.php
- Step 2: Define the install() method
- Step 3: Create a custom attribute
To create a product attribute, Firstly we need to create a simple module for that.
Create the first registration.php, composer.json, and module.xml file for defining our module. Here I have used Webiators as Vendor/Namespace where AddProductAttribute is a module name.
Create registration.php file Path:
app/code/Webiators /AddProductAttribute /registration.php
|
1 2 3 4 5 6 |
<?php use Magento\Framework\Component\ComponentRegistrar; ComponentRegistrar::register(ComponentRegistrar::MODULE, 'Webiators_AddProductAttribute', __DIR__); |
Create composer.json file Path:
app/code/Webiators /AddProductAttribute/composer.json
|
1 2 3 4 5 6 7 8 9 10 11 12 13 14 15 16 17 18 19 20 |
{ "name": "webiators/module-addproductattribute", "description": "AddProductAttribute module by Webiators", "require": {}, "type": "magento2-module", "version": "1.0.3", "license": [ "OSL-3.0", "AFL-3.0" ], "autoload": { "files": [ "registration.php" ], "psr-4": { "Webiators\AddProductAttribute": "" } } } |
Create module.xml file, Path: app/code/Webiators/AddProductAttribute/etc/module.xml
|
1 2 3 4 5 6 7 8 9 |
<?xml version="1.0"?> <config xmlns:xsi="http://www.w3.org/2001/XMLSchema-instance" xsi:noNamespaceSchemaLocation="../../../../../lib/internal/Magento/Framework/Module/etc/module.xsd"> <module name="Webiators_AddProductAttribute" setup_version="1.0.0"> <sequence> <module name="Magento_Catalog"/> </sequence> </module> </config> |
Create an InstallData.php file to install our custom product attribute in the Magento instance.
Path: app/code/Webiators/AddProductAttribute/Setup/InstallData.php
|
1 2 3 4 5 6 7 8 9 10 11 12 13 14 15 16 17 18 19 20 21 22 23 24 25 26 27 28 29 30 31 32 33 34 35 36 37 38 39 40 41 42 43 44 45 46 47 48 49 |
<?php namespace Webiators\AddProductAttribute\Setup; use Magento\Eav\Setup\EavSetup; use Magento\Eav\Setup\EavSetupFactory; use Magento\Framework\Setup\InstallDataInterface; use Magento\Framework\Setup\ModuleContextInterface; use Magento\Framework\Setup\ModuleDataSetupInterface; class InstallData implements InstallDataInterface { private $eavSetupFactory; public function __construct(EavSetupFactory $eavSetupFactory) { $this->eavSetupFactory = $eavSetupFactory; } public function install(ModuleDataSetupInterface $setup, ModuleContextInterface $context) { $eavSetup = $this->eavSetupFactory->create(['setup' => $setup]); $eavSetup->addAttribute( \Magento\Catalog\Model\Product::ENTITY, 'Test_attribute', [ 'type' => 'text', 'backend' => '', 'frontend' => '', 'label' => 'Test Atrribute', 'input' => 'text', 'class' => '', 'source' => '', 'global' => \Magento\Eav\Model\Entity\Attribute\ScopedAttributeInterface::SCOPE_GLOBAL, 'visible' => true, 'required' => true, 'user_defined' => false, 'default' => '', 'searchable' => false, 'filterable' => false, 'comparable' => false, 'visible_on_front' => false, 'used_in_product_listing' => true, 'unique' => false, 'apply_to' => '' ] ); } } |
Using Command-line, Go to Magento instance where you have installed Magento, Open Command Line,
|
1 2 3 4 5 6 7 |
php -dmemory_limit=5G bin/magento setup:upgrade php -dmemory_limit=5G bin/magento setup:di:compile php -dmemory_limit=5G bin/magento setup:static-content:deploy -f en_US php -dmemory_limit=5G bin/magento cache:flush php -dmemory_limit=5G bin/magento cache:clean php -dmemory_limit=5G bin/magento indexer:reindex |
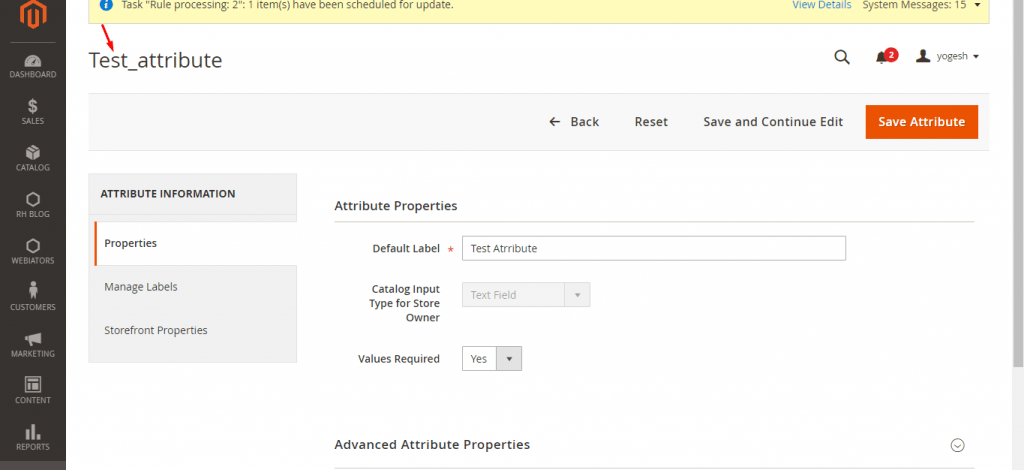
Now it’s time to see the result: