In this blog, we will see how the FedEx carrier is configured in Magento 2 based on eCommerce stores. Let us go through the configuring of the shipping method step by step :
Step 1: Make a Merchant Account in FedEx
Before you enable the FedEx carrier as a shipping method in your Magento 2 admin panel, you first need to create a Merchant account with the FedEx carrier services. You also need to register for FedEx Web Services Production Access.
Step 2: Enable FedEx
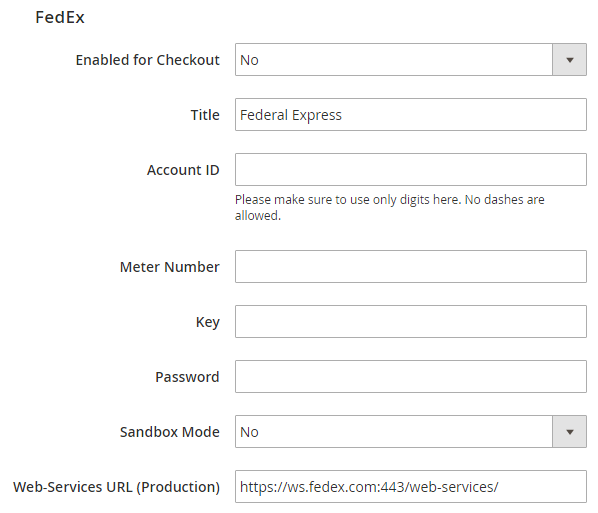
- Enabled for checkout: Select Yes to activate the FedEx carrier.
- Title: Give a name to the FedEx shipping method to appear on the checkout page.
- Account details: Fill the details for Account ID, Meter number, Key and Password.
- Sandbox Mode: Select No to run the FedEx in a live environment
- Web-Services URL: Keep the URL for FedEx web services
Step 3: Configure the Packaging Description
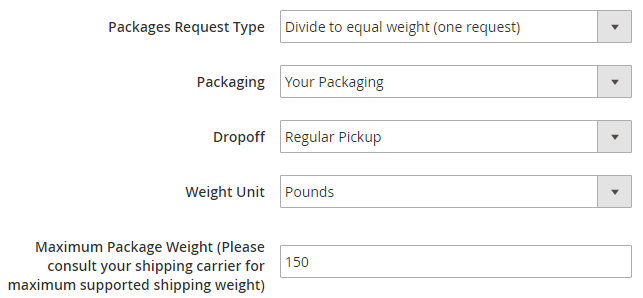
- Packages Request Type: Here you get to select one option from Divide to equal weight or Use Origin Weight. Divide to Equal Weight: If the packages can be divided into equal weights, the request can be sent as one for the shipment of multiple packages.
- Use Origin Weight: When the multiple packages shipment request is submitted as one.
- Packaging: Here, you need to select the packaging type for the product shipment. You can select from FedEx Envelope, FedEx Pak, FedEx Box, FedEx Tube, FedEx 10kg box, FedEx 25kg box or your packaging.
- Drop off: Select a method (Regular pickup, Request courier, Dropbox, Business service center and Station) from the drop-down for drop off shipments.
- Weight Unit: Select a unit for the weight from the option of Kgs or
- Package Weight: You can fix the maximum allowed package weight from this field. The default maximum weight mentioned is 150lbs.
Step 4: Specify the Handling Fees
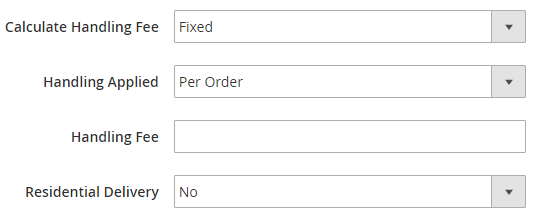
- Calculate Handling Fee: Select a handling fee method from the Fixed or Percent Method.
- Handling Applied: Select how to apply the selected handling fee on shipping cost either on per order or per package.
- Handling Fee: Put the amount of the fee after you have selected the handling fee method.
- Residential Delivery: Choose Yes or No for residential deliveries to B2C or B2B respectively.
Step 5: Allocate Allowed Shipping Methods and Applicable Countries
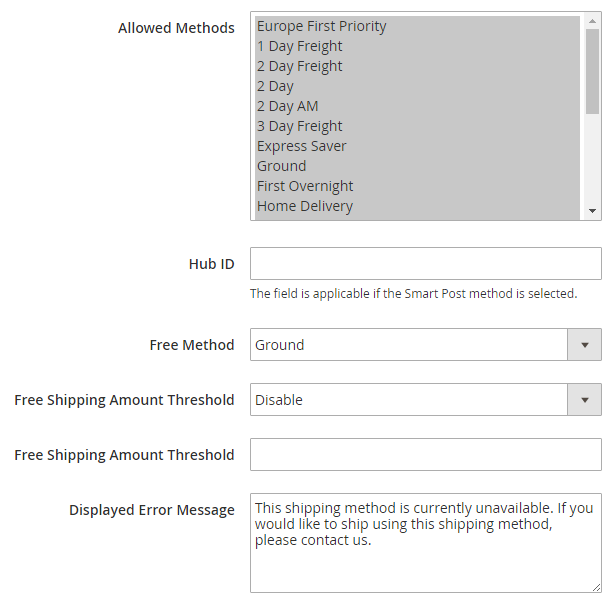
- Allowed Methods: Choose the methods which you wish to offer to your customers, from the list.
- Hub ID: You need to mention the Hub ID if you have selected the Smart Post method in the above field.
- Free Method: The method selected in this field will be applicable for free shipping.
- Free Shipping Amount Threshold: You can apply the free shipping method for the minimum amount mentioned in this field.
- Displayed Error Message: Write the message which you wish should appear when any customer selected method is not applicable to that shipment or package.
Assigning the Applicable countries:
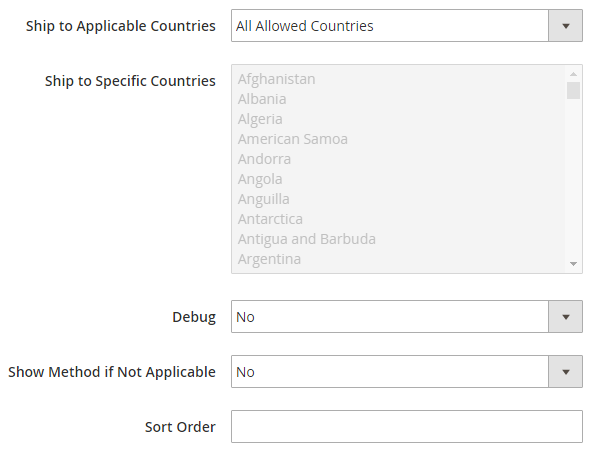
- Ship to Applicable Countries: Select any one option from All Allowed Countries orSpecific Countries.
- Ship to Specific Countries: When you select Specific Countries as applicable countries, you have to select the countries manually in this field.
- Debug: Select yes for this field, you want to make a log file for FedEx carrier.
- Show Method if Not Applicable: You can select yes to show this shipping method even if it is not applicable for the shipment.
- Sort Order: Specify the order of the FedEx carrier shipping method on the Checkout page.
This was all about the configuration process for the FedEx shipping method in Magento 2.
If you are facing any issue in any step while configuring in your store, Feel free to mention them in the comment section below. We will be happy to help you out!
Thank you.

